Tag Archives: Mixed Media

Weekly Art Journal Thursday Video #7

Good afternoon!

I am just now posting my Weekly Art Journal Thursday Video #7. I know that it is not Thursday, but I have had family visiting this week, and then have been down with a persistent bug that doesn’t seem to want to go away!

So, better late than never!! πŸ™‚

Here is this week’s video:

Here is a complete list of materials I used:

  • Delta Ceramcoat acrylic paints: OJ (02649), Pop Pink (02646)
  • DecoArt Crafter’s acrylic paint: Tropical Blue (DCA102)
  • Folk Art acrylic paint: Neon Pink (2850)
  • Liquitex white gesso
  • Miscellaneous sheets of deli paper that I had Gelli plated on a few weeks ago (video is posted below)
  • Scissors
  • Golden’s Fluid Gel medium
  • Ranger Dyan Reaveley’s Dylusions Stencil, 5 by 8-Inch, Blocks
  • Punchinella
  • Black Stabilo pencil
  • Water brush
  • Black pilot ink pen, from Scarlet Lime
  • White Signo ink pen
  • Thick carpenter #2 pencil
  • Paper towels
  • Black thread
  • Aleene’s Fast Grab Tacky Glue
  • Letter stamps
  • Ranger’s Archival Black ink pad

DSC05854

This week, I must confess, I was a bit distracted! I had family in town, and I was going to see if I could squeeze this spread, sneakily in, without cause for disruptions, which meant I was talking to my sissy while I got this layout started! You might notice that at some point in the video my jewelry disappears and I end up with black and white striped sleeves on! Yep, jewelry was me chatting with sissy, while creating, and jewelry-less was after they left, which by that point I was struggling through a really bad cold (those are PJ sleeves!)!! I am just thankful you can not hear all of my coughing going on!! πŸ™‚

DSC05872

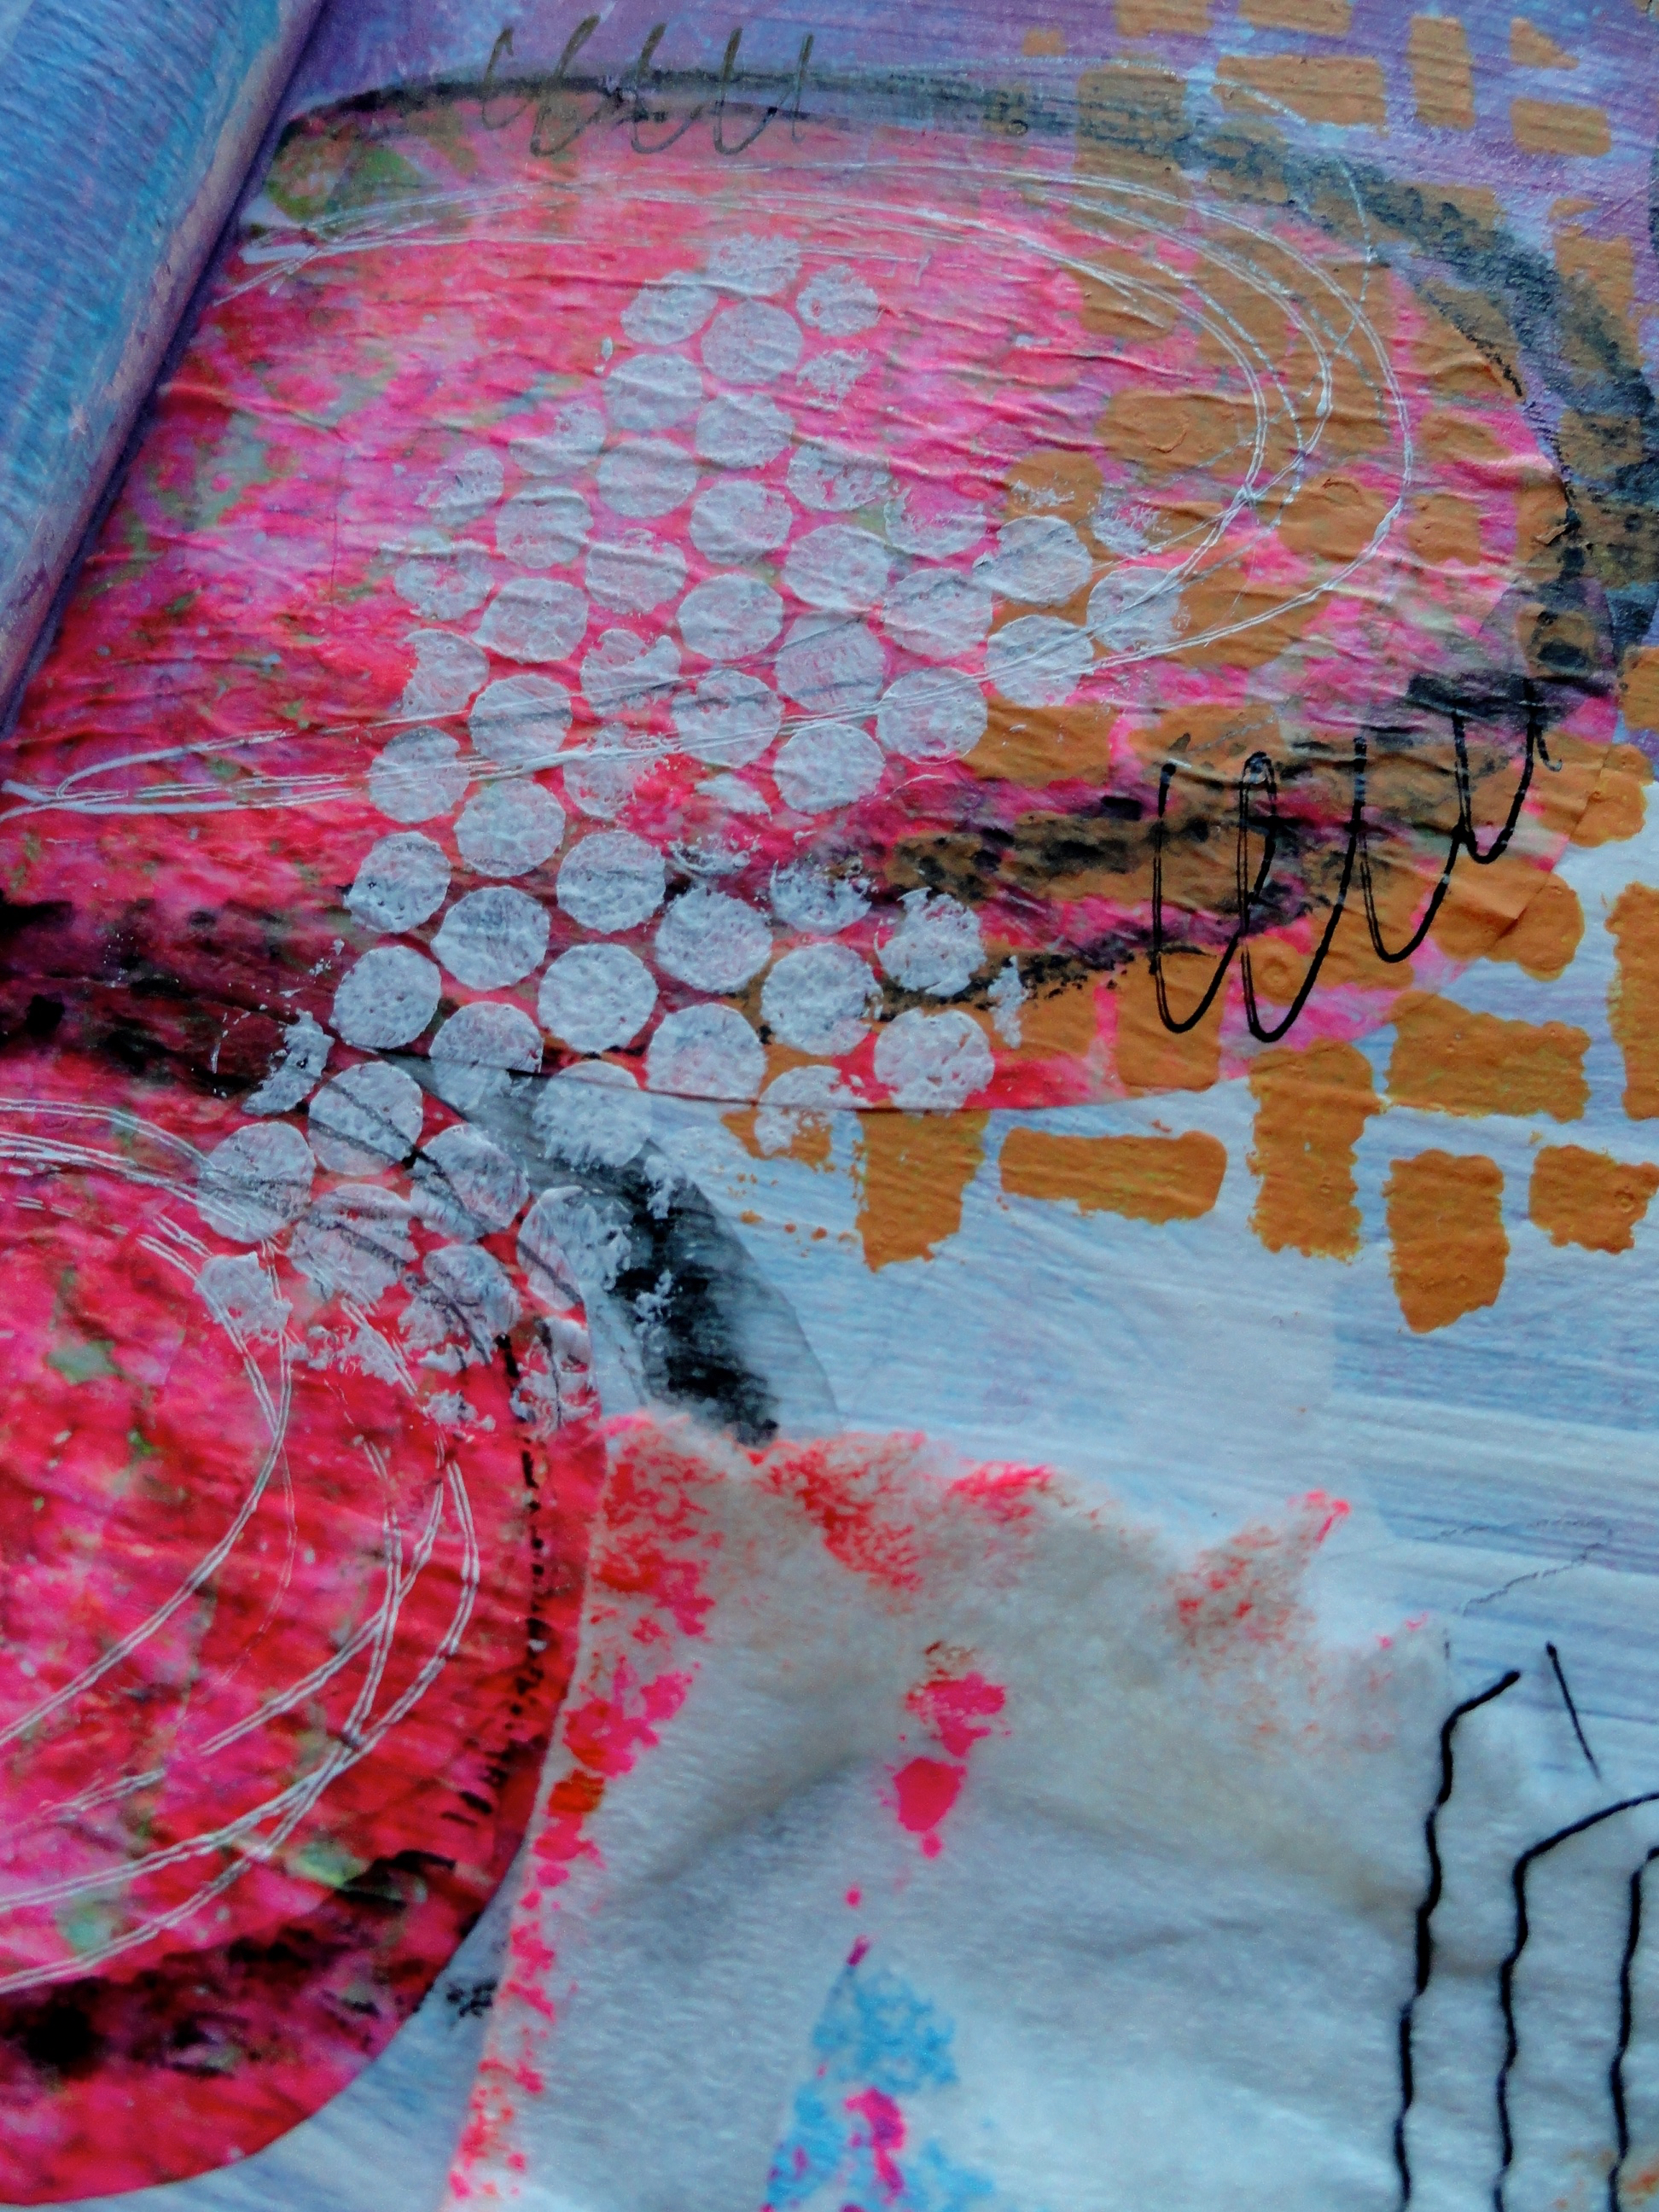
The only real plan I had for this spread was that I wanted to use some of the Gelli plated deli papers I had created a few weeks ago.

That video is located here:

I loved the way the deli papers ended up a little bit translucent so that the background could peek through.

DSC05869

What I didn’t like is that, because my attention was not 100% on what I was doing when I started this layout, I realized when I went back to finish this spread after my family had left, was that this page was a mess of colors!

DSC05862

I wasn’t really sure if it were going to be possible to tie it all together!

I loved the idea of using used paper towels as the background to my thought for this week, and I especially love the idea of adding some stitching on my sewing machine – I am going to have to use that technique more often!

DSC05860

and of course doodling!! You know I love me some doodling!!

DSC05873

The message of “Be Free” is particularly meaningful this week. You may know that I have been on hiatus from my analytical career for the past 5 months. Well, this week, I have made the decision that until my creative career gets off the ground, I am going to have to go back to that analytical job, at least until I can get my nest egg built back up again! This is not exactly what I want to do, but I know it is what I have to do if I truly want to be free!!! and FREEDOM is the goal!!

DSC05852

So, big changes are a-comin’!! I will keep you posted!! In the meantime I really hope you liked the way this week’s spread turned out! It ended up making me very happy!! πŸ™‚

DSC05859

If you have any ideas, or techniques that you might like to see me try in one of my future layouts, please let me know in the comment section and I will see what I can do to be accommodating! Also, I really do LOVE answering any questions you may have about art journaling, mixed-media, or anything you might have seen me do here! Please feel free to ask questions in the comments, and I will try and get back to you in a timely manner!!

Until next time!

Have a FABULOUS week! πŸ™‚

1 - Signature

If you want to have a different life, live differently!

Weekly Art Journal #4 Video

Good morning!

I am happy to announce that my weekly Art Journal video #4 has been posted to YouTube for your perusal!

http://youtu.be/QUh6p97oz1Y

I have a bunch of pictures to show you, but first the supplies I used this week are:

  • Art Advantage Acrylic Paints: Cadmium Yellow Medium Hue,Β Cerulean Blue, Permanent Green Light
  • Lumiere Acrylic Paint Pearlescent Magenta (573)
  • Folk Art Acrylic Paint Neon Pink (2850)
  • Apple Barrel Acrylic Paint White (20403)
  • Liquitex Acrylic Ink Vivid Lime Green
  • Ranger Stickles: Purple (SGG20615), True Blue (SGG29052), Waterfall (SGG20639)
  • Hero Arts Wood Mounted Stamp: Painted Circle (E5784), Old French Writing (H2365)
  • Inkadinkado Wood Mounted Stamp: K-Paper Artsy Tre’port Postal
  • Cosmo Cricket Wood Mounted Stamp: Cluster Border (PS0647)
  • Ranger’s Black Archival Ink Pad
  • Golden’s Gel Medium
  • Liquitex White Gesso
  • Black Stabilo Pencil
  • Water Brush
  • 1-1/2 inch brush
  • Pink tissue paper (I had gotten in a birthday present gift)
  • Silver Butterfly wall decal – I am not sure the brand, but I found it in a set on clearance at Wallmart for $1
  • Aleen’s Tacky Glue

DSC05758

I had a lot of fun doing this spread this week! Unlike most weeks, where I am just winging it, this week I had a vague idea about what I wanted to do, but had really no idea what my thought was going to be, or how to pull it all together. It wasn’t until I was finally spending time arting in quiet, while I was actually doing these art journal pages, that it finally seemed to come together!

DSC05760

Did you notice how much gesso I used? ACK!!! I was very heavy handed, which means it really took forever to get that layer to dry! Matter of fact, it never did completely dry until the next day!! Too much gesso + Β an immediate layer of gel mediumΒ + another layer of thick body acrylic paint =Β mamma-has-no-time-for-this-drying-craziness-so-I-had-best-be-careful-not-to-mess-this-up!!! πŸ˜‰

DSC05755

I don’t really have any hard and fast rules for art journaling, or for mixed media in general, except for one, always ALWAYS let your layers dry thoroughly!! Unless you want them to blend together, smear, run, slide off, or flake off, than that is a different story, but I was having a heck of a time sticking to this rule for this spread! What can I say, patience is NOT one of my virtues! πŸ™‚

DSC05763

As you may have probably noticed – I have a heck of a time getting drips to look right! I think I know how to do it, but when I am in full on “art mode”, the proper way to do this seems to slip my mind, and I find myself struggling to get the look right! Not to worry, though, this is all a learning process for me, and I know I will continue to get better! That is the point, right??? πŸ™‚

DSC05754

I also have been wanting to find a really good quality neon fluorescent paint set! I did purchase a cheapie set this past week, but it was not a high quality brand, so there isn’t much pigment in the paint, which means I have to use A LOT of it to get the rich pop of color I am wanting, so I will keep looking! If I find a really good one I will let you know! ( I should’ve known – you get what you pay for!)

DSC05772

So, when I was stamping, to get more texture, I stamped right into a big glob of wet green thick body acrylic paint. This happens, and it is fine, and can add a lot more texture because it causes peaks and valleys in your acrylic paint if you let it dry that way, but make sure you stop what you are doing and clean your stamp thoroughly, right away! II have an old toothbrush on standby for just such occasions.) If you leave the acrylic to dry on your stamp, it will ruin your stamp, because it changes the shape of the stamps ridges. NOTΒ what you want! I’m just saying’! πŸ™‚

DSC05773

Anyway, although this may not be my favorite layout – I am not sure how I am digging this silver butterfly decal – it was a learning process, which is the point, as well as stopping just to listen to what your soul is saying to you, so in that way I LOVE this spread!!

Now for your input, do you have any questions, or comments for me? Is there any kind of mediums or techniques you would like me to use in future videos? Just let me know in the comment section of either my blog, here, or at my YouTube channel, and I will try and get a timely response to you! πŸ™‚

Until next time!

Here is to a FABULOUS day!! πŸ™‚

1 - Signature

If you want to have a different life, live differently!

Weekly Art Journal Video #3 Posted!

DSC05406Good morning!

I am happy to announce that my new weekly art journal video has posted! I would love for you to check that out here:


DSC05407

Materials used:

  • Acrylic paint colors:
    • Americana: Carousel Pink (DA274), Turquoise Blue (DA268)
    • Folk Art: Wicker White (901)
    • Apple Barrel: Canary Yellow (20586)
  • Black and white papers from Deco Page
  • 2 miscellaneous scrap book papers (unknown source)
  • Golden’s Matte Medium
  • Black medium point Sharpie
  • White Signo pen
  • Black Stabilo pen
  • Black Scarlet Lime Pilot pen
  • #2 pencil
  • Inexpensive 1 1/2 inch paint brush
  • 1 inch brush
  • Aleen’s tacky glue
  • Wood mounted letter rubber stamps
  • White card stock
  • Black Archival ink
  • Punchinella

DSC05410

As usual, I went into this journal spread without any real idea about what it was I was wanting to journal! I did, however, know that I wanted to use the color pink.

DSC05412

After I had gotten a wash of theΒ color pink down, all I could think was “This page is VERY Pepto Bismol”! I knew it was time to pull out some more paint colors to add to the mix! Thankfully, out came my turquoise and Canary Yellow! After those colors were laid down, I was much happier with where this spread was heading!

DSC05413

Every week, I try to change things up just a little by adding a newly discovered technique, or a new product to the spread! This week I had added marks using a black Stabilo pencil! I LOVE this pencil!! I now want to find one in brown!!! It sounds like it writes on all sorts of surfaces, but for my art journaling page, it writes like a charcoal pencil, but add water to it, and it smudges up nice and dark – as you might have noticed in the video. I noticed when I dried it with my heat tool, it did dry a bit more transparent than what I had expected, but overall I still really love this product!

DSC05419

This week, I really wanted to grunge up my spread a little more than normal, giving it more of an antique-ey/aged looked. I did this by adding various marks with Stabilo pencil, black ink with a pen, and a #2 pencil! I really like the way that this turned out and I am thinking that this technique is going to stick around!

DSC05427

I also really like to add highlights using my white Signo pen, especially when you want something to pop off of dark areas of your spread! πŸ™‚

DSC05420

You may already know this, but while I am doing my weekly spreads, I make it a point not to try and stay in quiet so that I can hear what message my soul is trying to tell me, so that I can share it on my journal spread. This week was no different!Β I also added some of my words of truth throughout my spread in various places using my Scarlet Lime Pilot pen, and then I heard this message loud and clear, and just new that I needed to share this as my main message for this week:

“For an authentic life, remove anything that does not honor you.”

This is a thoughtΒ that I have been trying to consciously implement in my life over the past 6 months!

DSC05423

As you may have noticed, I LOVE adding words to my spreads using rubber stamps, Archival ink and card stock, which are actually recycled business cards – I bet you didn’t know that!! πŸ™‚ Anyway, this week I wanted to change that up by adding some of my own handwriting! I don’t normally like my handwriting, but I thought I would ’embrace the messy’ and just go for it!! Β I like the way that it turned out!

DSC05428

This week’s art journal spread is my favorite so far! I am really loving this weekly challenge that I have placed on myself, and cannot wait to see how my technique evolves over the next few weeks!! If you would like to follow along, please subscribe to this blog, and my YouTube channel!

DSC05426

I would also LOVE to hear anythings thoughts, comments, or questions you may have!! Maybe we can learn more together!! πŸ™‚

Here is to a FABULOUS day!! πŸ™‚

~Chrissie πŸ˜‰

If you want to have a different life, you have to live differently!


My First Ever Weekly Art Journal Video!

Good morning!

As promised yesterday, here is some close up pics and details about my first ever weekly art journal video!

That video can be found here.

As with all of my art journal pages, I always go into the project with no real idea on what it is I want to create. I sometimes have a vague idea about maybe what colors I want to use, or maybe an inspirational thought, but for this spread, I was essentially going in with no expectations of any kind.

I was having a hard time getting quiet, or spending time in any kind of quiet, which meant I had been constantlyΒ surrounding myself with random noise; the television, music, the background noise at a coffee shop, etc, etc. I also am a firm believer in signs from my Truth teller, and I kept seeing the message,

“Get quiet so you can hear what I am trying to tell you!”

Well, in all honesty, I had been blatantly ignoring it. You see, I was afraid that if I were to get quiet I would make the realization that I had completely ruined my life by walking away from my career a few months ago, and that by spending my time doing everything and anything that I wanted to do, maybe somehow I was being absolutely and completely selfish – HOW DARE I???


DSC05358


So, I had started this journal page, with my camera set toΒ record, not knowing what my page was going to turn out looking like, but knowing that it was going to be my very first video to post on YouTube. I had NO IDEA how to do that! I have had no experience recording videos, editing them, how to upload them, or anything! I was pretty scared. However, I wanted to make sure that when I recorded that there wasn’t any background noises that I would have to fight with. (I didn’t know that I could mute all of those out!) So this forced me to spend a few hours in absolute silence, just focusing on arting.DSC05360

Well, the message of getting quiet so I can hear my voice kept popping up again, over and over. I wasn’t sure why, but by the time I got to the part of my journal page where I needed to wrap it up with a thought – I KNEW that was the thought that I had to get down on to paper!

DSC05367

“Don’t be afraid of silence,

for that is where you will find your voice.”

DSC05362

When I had finished this page, I was so happy with it! It really made me happy, and it said something to me that I knew, from the bottom of my soul, was a truth that I needed to hear right now!


Now getting it ready for uploading was another story all together! I had no idea how I was going to edit it, get music behind it, upload it, or anything. So, I started Googling for help like a crazy person!! πŸ™‚ Little did I know I had everything I needed to do this already in my possession!!DSC05364

It took me longer than I had expected – about three days longer, to be exact, but I did it!! I did a great big ol’ happy dance, and told all of my peeps to go check it out!!! WHEW!!! πŸ˜‰

Anyway, I look at this page now, almost a week and half after actually creating it and I realize that it is the exact perfect message that I needed to hear in that moment. Silence is something to anticipate and to fully be present to yourself and your Truth teller whenever you have the opportunity to embrace the silence!!

I hope you like this spread, and if you have any questions or comments, please let me know in the comments section! I would love to hear your thoughts!!

Much love to you!! Here is to a FABULOUS day! πŸ˜‰

~Chrissie

If you want to have a different life, live differently!

Weekly Art Journal Page Video Series!

DSC05373Good afternoon!

I have been “retired” since the 4th of July of this year. These past 3 1/2 months have practically flown by.

I have been spending my time taking care of myself, catching up on some much neededΒ sleep, getting back in touch with friends that I hadn’t had time to spend time with before, watching copious amounts of artist’s videos on YouTube, arting with friends in town, and playing up in my art studio. Yes, I know I am a very VERY lucky girl!!!

DSC05388

Those of you who have been reading my blog might know that I really love arting, but in the past 3 /2 months I have discovered that all things mixed media and art journaling have become quite essential to my sense of happiness. That really shouldn’t be surprising to me, but it really has been! Because of my newfound love affair, (hee! hee!) I have been trying all sorts of new products, mixed media techniques, and all sorts of new art ideas and projects to help me explore this new creative outlet!

DSC05379

Although I wouldn’t change a thing about the past 3 1/2 months, I think that it is time that I stop frittering away my time, and put all of this arty goodness to use, at least in some small way! So, as my first act of artsy bravery, I have decided to start sharing my artwork with the world…er…well, at least anyone in the world who might be interesting in seeing it! πŸ™‚ To do this, I thought it would be fun to start my very own YouTube channel!!

https://www.youtube.com/channel/UCm4Of6Y-cX-foVyd-upZKbQ

IΒ am so excited to alsoΒ announce that I have started a weekly Art Journal Page video series, and I am very happy to share that I have already uploaded my first two videos! Last week’s video took such a long learning curve, that I couldn’t seem to muster the strength to have a blog post accompany that video, however I will get it together enough to post today’s video details now! and, I will work on getting last week’s video info up tomorrow!

Here is this week’s Art Journal Video info!

DSC05377

I went into this spread with no idea on what was going to come out on the pages. I just picked a few colors I thought might look good together and went for it! The background stamp that I chose is one of my favorite stamps! I find that I use it often in my journaling projects!
DSC05396

I also thought some drips would be nice, I have seen a lot of my favorite artists do this and thought it would be easy to do, which I am sure it really should have been, but as you might’ve seen…it was a little trickier, and messier than I had expected!! At least I didn’t get any of the red paint on my beige carpet!! WHEW!!! Can I also mention how much I love my newΒ fineline bottles??? I just love how easy they are to use. I have one bottle for my white paint, and one for black! I highly recommend them!

DSC05391

The green that I added to this page was purely a gut reaction to wanting to go in the absolute opposite direction from where the page had gone at the get go. After putting the red drips down the page, it just looked like the scene of a bloody massacre!! LOL! I think the green turned out rather well, and felt the need to make sure to spread the green all throughout the design.DSC05375

By the time that this spread was completed, I was a very happy girl!!

Not only because I was able to salvage this design and turn it into something that looks like I had planned it that way on purpose, but because I got some much needed guidance on some questions that I had been mulling over.

While I am arting, I do so in silence. I do that so I can hear my soul tell me what I need to hear, or teach my what I need to be taught. This page caused me to reflect on how amazing this past 3 1/2 months has been. It has been amazing, but it has also been a dream that is not maintainable…at least not yet. Even though my sweetie has given me a free and clear to continue on like this for as long as I want, I want more. I want to be earning my keep, making a living.

Living a life that is bigger than just me.

I really don’t know what all of that will look like, but I know right now, this first step of sharing my art with you is my first start! I keep hearing, “You don’t have to see all of the steps in the staircase, just see the first step, and all subsequent steps will appear at the exact right time!” That is what this is. My first step!! I can’t wait to see how my staircase unfolds!! πŸ™‚

DSC05371

As for my YouTube channel and videos, I would LOVE it if you would watch, thumbs up, subscribe, and share any comments or feedback you might have! That would be EXCELLENT!!

So here is to putting on my big girl panties and taking that first step!! πŸ™‚

~Chrissie B.

If you want to have a different life, live differently!

Tutorial Tuesday – Textures with Spackling Paste!

Good evening!

Tonight, for Tutorial Tuesday I thought I would share one of my favorite texture techniques, and that is texturizing with spackling paste! I know, that may sound crazy, but hear me out!! πŸ™‚

What you will need for tonight’s project is:

Some spackling paste from your local hardware store.

Spackling Paste Textures - 1

Various stencils. I have a bunch of different styles that I enjoy using! πŸ™‚


Spackling Paste Textures - 2


Various random tools for marking up AKA texturing the spackling paste.

Spackling Paste Textures - 3

You will need a palette knife, as you can see I have many different sizes, styles that I can choose from.

Spackling Paste Textures - 4

Some acrylic paint. I used some inexpensive craft paints for this, but you could use high pigmented paints such as Golden’s fluid acrylic, or other tube paste. Either would work just great!


Spackling Paste Textures - 5

and finally, you will need some acrylic gel medium, or Mod Podge will do too!

Spackling Paste Textures - 6

For this sample project, I started with an inexpensive plaque that I picked up at my local craft store for a dollar. I painted a solid color – any color will work!

Spackling Paste Textures - 7

I used sequin waste for my texture on this project. Position the sequin waste at the top of the plaque. Note: I had covered the holes of the plaque with painters tape before I started, so I would not fill the holes with the spackling paste.

Spackling Paste Textures - 9

Place a dollop of the spackling paste out onto your work surface – mine just happens to be freezer paper for easy cleanup.

Spackling Paste Textures - 10

Using a palette knife, spread some of the spackling paste over the top of the sequin waste.

Spackling Paste Textures - 11

To create a gradual gradient design, I decided to add yellow acrylic craft paint to my spackling paste.

Spackling Paste Textures - 12

Mix thoroughly.

Spackling Paste Textures - 13

Reposition sequins waste to cover the middle section of the plaque.

Spackling Paste Textures - 14

Apply the now yellow spackling paste, making sure to blend in with the overlapping white.

Spackling Paste Textures - 15

Do the same thing again, but this time adding orange acrylic craft paint to your yellow spackling paste.

Spackling Paste Textures - 16

Mix thoroughly.

Spackling Paste Textures - 17

Reposition sequin waste to cover the lower portion of the plaque.

Spackling Paste Textures - 18

and remove sequin waste.

Spackling Paste Textures - 19

Remove the painters tape that was covering the holes – do not worry about the areas that have no spackling compound. When I knot the ribbons that will be used to hang this plaque, those blank areas will be hidden! πŸ™‚

Spackling Paste Textures - 20

Cover the whole thing with the acrylic gel medium, or Mod Podge, to seal it and there you have it. Isn’t that easy?? And really economical too!

Can you see a theme in all of my art tutorials??? Let’s just say mama doesn’t have a lot of patience!! πŸ˜‰

Here are a few other examples of how I have used this technique in the past:

This is white spackling compound used over one stencil.

Spackling Paste Textures - 21

Here is the spackling paste, turned blue, over a painted and torn paper background (another one of my favorite techniques!)!

Spackling Paste Textures - 22

And finally, here is a project where I basically frosted the plaque with white spackling paste, and drew in the still wet paste. Once it was completely dry, I painted blue over the top of it, and wiped the excess off with a paper towel, leaving more paint in the recesses.

Spackling Paste Textures - 23

This “create” was created using the tip of a butter knife, the stripes were made using the tines of a fork.

Spackling Paste Textures - 24

Here are more of those fork tine lines, and the swirls were created with the blunt end of a skewer! πŸ™‚

Spackling Paste Textures - 25

There you have it! I hope this inspires you to go to your local hardware store and give this simple, but fun technique a try!! Please make sure to share your results with me, I would LOVE to see how you put your own spin on this fun technique!!

Here is to a FABULOUSLY ARTSY evening! πŸ˜‰

Signature Line

If you want to have a different life, you have to live differently!!

Artsy Blog HopThursday!

Inner Child Blog HopGood evening!

Welcome to Artsy Blog Hop Thursday! πŸ˜‰

Are you an artist, or an artist at heart? Would you like to have a way to share your art with the world??? Me too, and that is why I started Artsy Blog Hop Thursdays!! Join me and other artists every Thursday evening as we paint, photograph, collage, crochet, write, draw, sketch, doodle, bead, knit, sculpt, cross-stitch, make fancy mud pies, or whatever your chosen artsy medium is to your heart’s content! You can make your art as personalized as you wish.

With every weekly Artsy Blog Hop Thursday Post I’ll suggest a topic for the following Thursday, and each weekly post will have a linky widget so we can visits each others masterpieces with ease.

Sounds like fun?

Give it a try, you know you want to!!!

If you have any questions please let me know and I will do my best to get you an answer. Please remember we are learning this together! If you would like to leave a topic of the week suggestion, please feel free to do that too, in the comment section of this post!!

Happy Arting!!

This week’s topic isΒ  πŸ˜‰

Your Inner Child

A little bit about my chosen piece for the topic “Your Inner Child”. I actually thought this would be a lot easier to do, and I had done a few pieces, but nothing really made me happy. What I ended up doing was thinking about me when I was little, and I remember LOVING to draw rainbows! EVERY ONE of my pictures had to have a rainbow in it, so that is what I decided to paint today as a reminder to myself that my inner child is still in here! πŸ˜‰

Now it is your turn!!

To share your link:

  1. Click on the blue frog head entitled “Links in Collection” button below (This will take you to a new page)
  2. Click on “Add Your Link” button
  3. Enter your URL, Name, and E-mail in appropriate fields
  4. Click “Next Steps”
  5. Choose an image by clicking “Select” under the picture you would like to show for your link

And that is it! It might take a few minutes for your link to show up, but be assured, it will be there! πŸ™‚

Next week’s topic is:

Topic of the Week - Nature

Now before I let you go this evening! I am very excited to share the winner from my first ever monthly giveaway!

YEAH!!

I am happy to announce that I will be gifting the book β€œInner Excavation: Explore Your Self Through Photography, Poetry and Mixed Media” written by Liz Lamoreux to our lucky winner, who is…

***vjstracener***

YEAH!!! I will be contacting you this evening to get your mailing information, so I can get your new book out in the mail first thing in the morning!!

Thank you so much for all who commented! It was very inspirational to read all of your dreams!! I hope that we all get the chance to act on those dreams sooner rather than later! πŸ˜‰

Here is to a FABULOUSLY ARTSY evening! πŸ˜‰

Signature Line

If you want to have a different life, you have to live differently!!

Inspirational Thought and a Monthly Giveaway!

Good evening!

I am so excited to let you know that tonight I am doing my very first monthly giveaway! However, before I get to that I wanted to share tonight’s inspiration thought! πŸ™‚

“Why should we all use our creative power…? Because there is nothing that makes people so generous, joyful, lively, bold and compassionate, so indifferent to fighting and the accumulation of objects and money.”

~Brenda Ueland

Now for my first monthly giveaway! YEAH!!

I am happy to announce that I will be gifting the book “Inner Excavation: Explore Your Self Through Photography, Poetry and Mixed Media” written by Liz Lamoreux to one lucky winner.

Inner Excavations

The way to get your chance to win this lovely book, all you need to do is to answer this question in the comment section of this post:

If you knew that you could not possibly fail to make your dream life come true, what would you do starting tomorrow to make that happen?

That is it. Sounds easy enough right? I will post the winner in tomorrow night’s post, which will come out at 6 PM Pacific Time.

Good luck to all of you, and I can not WAIT to read your answers! πŸ˜‰

Here is to a FABULOUSLY ARSTY evening! πŸ˜‰

If you want to have a different life, you have to live differently!!

Tutorial Tuesday: Packing Tape Image Transfer

Good evening!

Tonight I wanted to show you a cool, inexpensive image transfer technique! I am calling this technique Packing Tape Image Transfer.

To get started, there are a few supplies you will need to round up:

Packing Tape Image Transfer 1

Clear Packing Tape

Scissors

A pair of scissors

Water - I am using a spray bottle

Water. Here I am using a small spray bottle, but you can use a bowl of water and a brush, or whatever is handy.

Images cut out from magazines, printed on a laser printer, or photocopied images

You will need various images either cut out from magazines, printed on a laser printer, or photocopied images. The important thing about the images that you choose is that you want to make sure the ink is colorfast. You do not want the image to run when you get the image wet.

I have a tendency to use small images; images that fit the height of the packing tape, however you can use larger images by overlapping the edges of the tape to make sure the entire image is covered by the tape.

To get started press the tape to the image, making sure that the image is fully covered, and smooth. You can use a brayer, a bone folder, or a finger, which is my tool of choice to make sure the image is stuck firmly.

Press the tape to the image, making sure that the image is fully covered, and smooth

Flip the adhered image over and spray with plenty of water, let soak for a few minutes. You can also brush water on with a brush if you would like, and I have also heard that some people sometimes just drop the entire adhered image into a bowl of water to accomplish this – I find that spraying the water is just faster, and less messy for me! πŸ™‚

Flip the image/tape over and spray with plenty of water, let soak for a few minutes

After a few minutes of letting the water permeate the paper, start vigorously rubbing the back of the image to peel all of the paper off. The thicker the paper, the longer this will take. Be careful that when you get down to the ink from the image itself, make sure not to rub or scratch the ink off of the tape, otherwise you will end up with only a partial image. However, if you do not rub all of the paper off, you will end up with a milky looking transparency. So stop when you get to the desired look that you are going for.

After a few minutes start vigorously rubbing the back of the image to peel all of the paper off

Once all of the paper has been rubbed off, you will then be left with a transparent image to use any way you would like. NOTE: The tape will still be tacky to the touch, and can be stored by placing on a sheet of wax paper, if you are not going to use them right away.

Once all of the paper has been rubbed off, you will then be left with a transparent image to use any way you would like

Here is a sample of another magazine image I have created a transparency out of, and have overlayed it onto some decorative paper.

Here is a sample of another magazine image I have created a transparency out of, and have overlayed it onto some decorative paper.

Here is an example of a journal page that I used this technique on the words, which I printed using a laser printer.

Here is an example of a journal page that I used this technique on the words, which I printed using a laser printer.

NOTE: Even though these images were still tacky to the touch, I used Gel medium to make sure that they will stay adhered to the pages.

I hope that you have enjoyed this Tuesday Tutorial and are inspired to give this technique a try yourself! If you do, please feel free to share the link with us in the comment section! I can’t wait to see what you come up with!

If you have not yet subscribed to This Artsy Life already, please do so by clicking on the Subscribe button kn the right-hand column.

Also please feel free to take a copy of my Blog Button to share with your blog readers. That Code is found under the This Artsy Life Blog button in the right hand column.

You will be happy that you did!

Here is to a FABULOUSLY ARTSY evening! πŸ˜‰

If you want to have a different life, you have to live differently!!

Playing in the Art Studio!

Good evening!

I have spent a good portion of my day today playing in my art studio, and wanted to share the two pieces that I have created today!

I am still trying to discover “my style”, and I am busy practicing drawing faces, and hair, and who am I kidding, just drawing in general! πŸ™‚ I am really having so much fun arting! mixed media just seems to be something that feeds my need for various techniques, mediums, and textures! I really am loving it!!

As for these two pieces, they were made using old book pages, tissue paper, ink, stamps, acrylic paints, gel medium, and lots of found items to make all of the different textures on the page, not to mention an ink pen – because I really LOVE adding my own little doodles to each piece!!

Talking about doodling, I am finding that doodling is really good for me! It keeps the creativity muscles warm! Doodling is almost zen-like as I get still, slip into quiet mode, only focus on me and my pen, as I let my mind wander. It really is such a sweet place for me!! I really want to make sure that I incorporate doodling into every one of my pieces!

So, anyway, as always, I would love to hear your thoughts! πŸ™‚

Here’s to a FABULOUS evening!

If you want to have a different life, you have to live differently!